DIY Measuring Guides
Video Guides
Before you go any further, you may find it helpful to watch our measuring videos:
Sash Window Measuring Guide
These video tutorials guide you through the process of accurately measuring sash windows. The first video provides a quicker guide, for more detailed instruction please watch the second video.
Casement Window Measuring Guide
These video tutorials guide you through the process of accurately measuring casement windows. The first video provides a quicker guide, for more detailed instruction please watch the second video.
Leaving room for the magnetic strips
The magnetic strips are 12.5mm or 20mm wide, depending on size of panel. As a rule we apply 12.5mm up to 1m² and 20mm for any larger area. The magnetic strips available are 12.5mm or 20mm wide, and are applied depending on the size of panel. You need more pulling power for the larger and therefore heavier sizes. As a rule, we apply 12.5mm to panels up to, and less than, 1 square metre. We apply 20 mm magnets to panels of 1m² or over up to a maximum panel size of 2m². You can measure for, and specify the wider strips for small panels if you wish, but not the reverse. The calculator on the web-site will tell you the size of panel once you have entered the numbers. There must be a flat shoulder on four sides so the panel is flush all round. Any ‘window furniture’ must be contained in the recess between the inner and outer panes of the window. Please supply measurements to the nearest 5mm.
IMPORTANT: PANELS MUST ALWAYS HAVE A GAP OF AT LEAST 2MM BETWEEN EACH ONE. THEY MUST ALL BE SELF-SUPPORTING ON THE MAGNETIC TAPE. THEY MUST NEVER CLASH WITH A HARD SURFACE.
Special instructions for sash windows
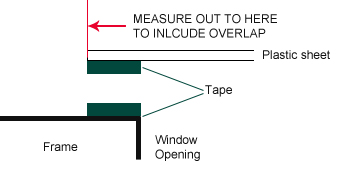
1. All panel size measurements must include the overlap on the frame edge.
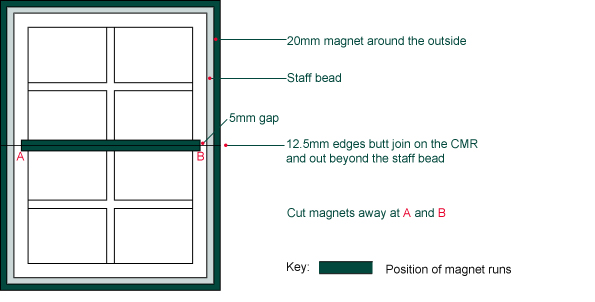
2. The centre-meeting rail (CMR) is a wooden batten which coincides with the top bar of the lower sliding sash. Fix with countersunk screws.
3. The CMR width will be 25mm. Its depth will vary depending on the depth of the staff bead and the surrounding box frame. This profile must achieve a flush finish to extend beyond the staff bead.
4. The staff bead sometimes protrudes forward of the box frame. It must either be planed down, repositioned or packing pieces must be added around the perimeter.
5. The 12.5mm magnet edges butt together at the mid-point of the CMR.
6. Install the lower panel first with its top in line with the mid point of the CMR. Follow standard DIY installation guide.